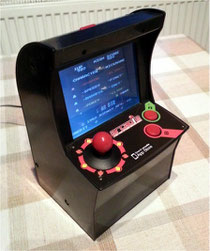
Uzebox Mini Arcade Cab

Some weeks ago I bought an Arcadi iPad mini Cab - it's an arcade enclosure kit from Zeon Tech for an iPAD Mini for only 30€. It was my intention to put an EUzebox kit and a cheap 5,6" TFT inside this enclosure instead an iPAD. You will get an nice small arcade cab for less as 100€ ...


Step 1 - Disassembly
Disassemble the enclosure by removing the both side screws (behind the labels). Remove the joystick unit and open the back part. Last but not least remove all labels.
Step 2 - mechanical preparation upper part of backside

Add some holes for the cables of display(1), joystick unit(4), potentiometer pcb (2) and the speaker (3)
Step 3 - mechanical preparation lower part of backside

add some holes for DC voltage connector, sd card and the reset button
Step 4 - preparation of joystick unit
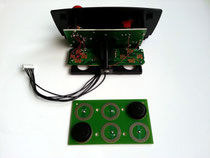
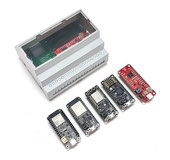
Remove the pcb with the 6 conductive rubbers and all cables first. I'm using the electronic of a cheap SNES controller as interface between the joystick unit and the EUzebox. Connect the SNES controller pcb with short wires with the joystick and the both buttons (button A and start). Instead the original SNES cable we using a small connector cable for the EUzebox...
Now mount the joystick unit and SNES connector pcb in the cab
Step 5 - assembly of the TFT and driving board
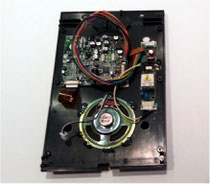
I'm using a cheap analogue 5.6" TFT with RGB input as display for the EUzebox kit. For the Uzebox you will need a TFT with CVBS input. Connect the driving board directly with the pads of the Scart connector (EUzebox) or CVBS output (Uzebox).
Mount the driving board and the loudspeaker at the back side of the upper part.
Step 6 - preparation of EUzebox kit

Assemble the Euzebox Kit according the assembly instruction for the EUzebox. Don't assemble the SCART connector and the SNES connectors.
Add an power amplifier to the breadboard area of the pcb.
Step 7 - mount the EUzebox pcb

glue the EUzebox pcb to the lower part of the back part. Connect the DC voltage connector, Reset and select button and all other cables to the EUzebox pcb. Mount the upper part with 2 crews to the lower part again.
Step 8 - final assembly
mount the backpart with the both side screws to the main cabinet and place the labels to the enclosure
Informationen
Featured product